9. Classes, Object-Orientation, and Pygame
9.1. Getting Started
You’re still reading this book?! Hurray! Good for you. Now that you’re here, you’ll be pleased to know that this is the best chapter of the whole book, so pay attention!
Thus far, all of our programs have been text-only programs. In this chapter, we will make programs that have graphics. To do this, we’ll use a Python code library named Pygame. Very shortly, we’ll learn how to install Pygame on your computer. Then, we’ll write some simple graphical programs and eventually animate the graphics to make them move around the screen.
Sounds like a big jump, right? Actually, it isn’t. You’ll find that Pygame graphics are just a re-application of the same principles we’ve been learning all along. That’s partly why this is the last chapter. We get to apply what we’ve learned to make something cool and interactive.
Eventually, we will reach a point in this chapter while learning about graphics where things will get a little frustrating. We will want to detect when two graphical things collide with one another, and that will seem hard to manage, especially when we have lots of graphical things flying around the screen. So, we will need to learn about things called objects and classes that will help us tremendously, and will make programming graphical video games way more fun.
Let’s get started by installing Pygame. Open Thonny and find the Tools menu.
Under the Tools menu you will see an option named “Manage packages…” Click
that option. A dialog window will be displayed to you. The dialog has a
textbox and a button at the top of its window. Enter “pygame” into the textbox
and press the button (which reads “Find package from PyPI”). Information about
the pygame package should then be displayed in the main part of the dialog
window, and beneath it should be a button labeled “Install”. Click the
“Install” button. After pygame has installed, click the “Close” button.
How do you know if the installation worked? In the Python shell window, you
should be able to type import pygame. If nothing bad happens, it worked! If
instead that statement makes Python puke red text, it did not work. At that
point, you may wish to solicit help from the nearest knowledgeable, techie human.
Assuming everything worked, it’s time to write code that uses Pygame!
9.2. Basic Pygame: Drawing Graffiti
Pygame can do a lot for us as programmers. Pygame can make a separate window to display our graphical program. Pygame then allows us to draw graphics on that separate window. Using Pygame, we can draw different types of graphics (shapes, colors, etc.), play sounds, and use a whole host of other features.
Because Pygame does a lot, the first Pygame program you see might look a bit daunting. So, let’s dive in. You can see our first Pygame program in Listing 9.1, and if you’d like to avoid typing this code or using copy/paste, you can download the code directly from this link.
In the paragraphs that follow, we will break down Listing 9.1 section by section.
 1import pygame
 2from pygame.locals import *
 3
 4pygame.init()
 5
 6white = (255, 255, 255)
 7black = (  0,   0,   0)
 8green = (  0, 255,   0)
 9
10screenwidth = 800
11screenheight = 600
12screensize = [screenwidth, screenheight]
13screen = pygame.display.set_mode(screensize)
14pygame.display.set_caption("WINDOW TITLE HERE")
15
16clock = pygame.time.Clock()
17
18done = False
19
20while not done:
21    # 1. Process events
22    for event in pygame.event.get():
23        if event.type == pygame.QUIT:
24            done = True
25
26    # 2. Program logic, change variables, etc.
27
28    # 3. Draw stuff
29    screen.fill(white)
30    pygame.draw.line(screen, green, [100, 200], [150, 300], 3)
31    pygame.draw.line(screen, green, [150, 300], [200, 200], 3)
32
33    # Flip the buffer and do short delay to maintain framerate
34    pygame.display.flip()
35    clock.tick(20)
36
37pygame.quit()
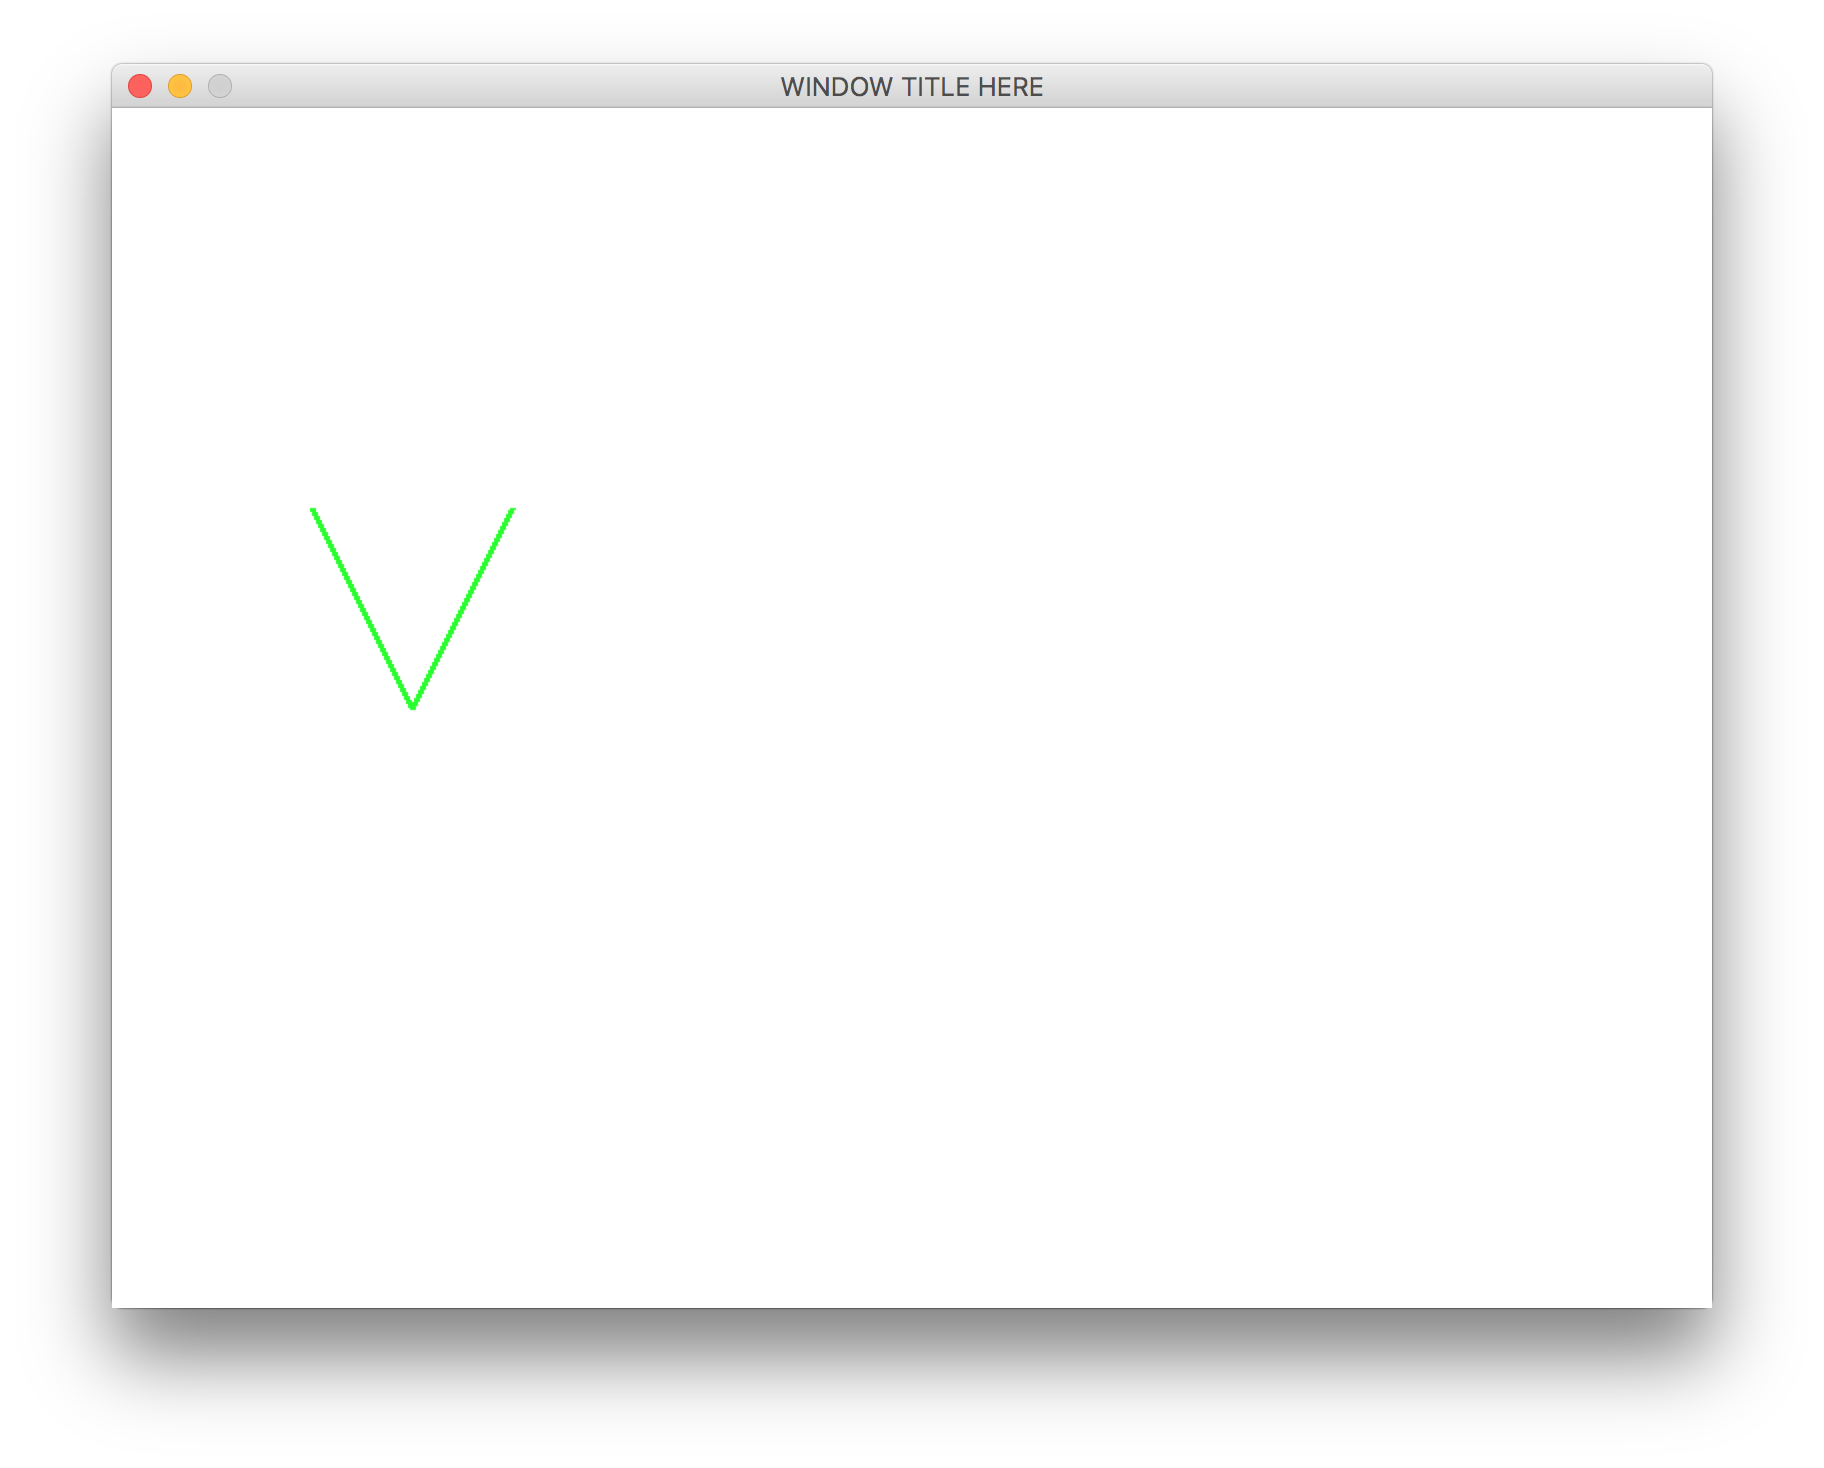
The result of the code in Listing 9.1 is the window shown in Figure 9.1.
That’s a lot of code to throw at someone, or at least it seems that way right now. It’s actually not a huge deal if we just slow down and take this code step by step. We’ll look at a block of code and then we’ll explain what it does.
import pygame
from pygame.locals import *

pygame.init()
The first two lines in this code snippet make it so we can use Pygame variables and functions in our code. The last line gets Pygame ready to start making graphical windows.
white = (255, 255, 255)
black = (  0,   0,   0)
green = (  0, 255,   0)
In this code snippet, we define colors that we think we’ll use in our program.
Colors are “mixed” together using amounts of red, green, and blue (in that
order, specifically). The amounts of each range from 0 to 255. Thus, when
we type green = (0, 255, 0), we are telling Python to make a color that has
0 of red, lots of green (that is, 255, which is the maximum), and 0 of
blue.
You might be wondering what the parentheses do. Note that this:
(0, 255, 0)
Kind of looks like this:
[0, 255, 0]
Notice all we did was change the type of braces – parentheses versus square brackets. We know that square brackets surround lists. If we use parentheses, it makes a list-like thing called a tuple. A tuple is a list that cannot be changed once it is created. We use tuples to make colors.
Sometimes students are confused by the indentation I’ve used in the above code snippet. Here is the code again:
white = (255, 255, 255)
black = (  0,   0,   0)
green = (  0, 255,   0)
Notice the extra spacing around the zeroes. This extra spacing doesn’t do anything special. It just makes the code look more readable. You’re allowed (and encouraged) to be artistic in writing code. Make your code pretty!
screenwidth = 800
screenheight = 600
screensize = [screenwidth, screenheight]
screen = pygame.display.set_mode(screensize)
pygame.display.set_caption("WINDOW TITLE HERE")
This code actually creates a graphical window. It chooses a width and height
and then uses the function pygame.display.set_mode to set up the window, which
makes it appear on the screen for the first time. The part of the code that
reads pygame.display is the name of a code module that contains the set_mode
function. Much of the code in Pygame is stored in different modules that have
descriptive names.
The last line changes the text in the title bar of the window. This text is called the window’s caption.
clock = pygame.time.Clock()
This line of code creates a “clock” that “ticks.” We’ll talk more about what
this clock variable is for in a little bit, but for now just remember that we
created a variable named clock.
done = False

while not done:
You’ve seen loops a lot in this book. Often, we’ve used loops to repeatedly ask for a number, a string, or a value in a list. In this case, the loop is going to repeatedly draw things on the screen.
Computer programs that create graphics don’t just draw those graphics on the screen and then wait. Computer monitors continually refresh their graphics on-screen, so programs need to be written to continually re-paint their shapes, colors, and images. This is the start of the loop that accomplishes this.
We create a Boolean variable named done. The loop will keep running until
done is True. Presumably, something inside the loop will change done
from False to True. We’ll see that very shortly.
# 1. Process events

# 2. Program logic, change variables, etc.

# 3. Draw stuff
Okay, so I’ve removed some code so that you can focus on the three main comment sections of the loop. In fact, I’ve labeled them 1, 2, and 3. Each time through the loop, we’re going to do three basic things.
First, we’ll handle events. Events are things like the user pressing a keyboard key or moving the mouse.
Second, we’ll perform program logic. If we want to change where graphics show up on the screen, or possibly check to see if there are any collisions between our graphics, we would do that in this section of code. We will use variables to keep track of where things should appear on the screen, and in this section we will update the values of those variables.
Third and finally, we’ll use the variables modified in the second section of code to actually draw shapes on the screen.
It is a really good idea to stick to this organization in the loop. Consider if we decided to try to draw something on-screen in part 1. It is possible that whatever we drew would end up erased or overwritten in part 3. This would also make our code really hard to debug.
Now, let’s look at the code under each of these comment sections.
# 1. Process events
for event in pygame.event.get():
    if event.type == pygame.QUIT:
        done = True
The function pygame.event.get gives us a list of all the events that have
happened to the program. This could be mouse clicks, key presses, etc. We are
using a for loop to cycle through the events, one at a time. If the event
happens to be a pygame.QUIT event, this tell us that the user has clicked on
the “close” button typically found at the top corner of the window. We should
respond by setting done to True so that the loop can exit at the top of the
while loop and then the program can end.
In future Pygame programs, we will handle more types of events in different ways.
# 2. Program logic, change variables, etc.
There’s no code in this section right now. This is because in this code sample, all we are doing in the next section (part 3) is drawing two lines at fixed locations. There is no real program logic.
# 3. Draw stuff
screen.fill(white)
pygame.draw.line(screen, green, [100, 200], [150, 300], 3)
pygame.draw.line(screen, green, [150, 300], [200, 200], 3)
Think of drawing on the screen in Pygame as being like painting on a wall or a
canvas. When we start painting on a surface, we want to make sure the canvas is
clear and uniform. If our canvas already had drawings on it and we wanted to
start over, perhaps we could paint over the existing drawings using one
background color. That is what we accomplish in the first line with
screen.fill(white).
Each of the next two lines of code draw a single line using the green color on
the screen variable we created earlier. The pygame.draw.line function
accepts five arguments. The first is the screen. The next is the color. The
third and fourth arguments are lists, each of which represents a point on the
screen. The points are the ends of the line segment we wish to draw. Each list
is of the form [X, Y] where X is the x-coordinate and Y is the
y-coordinate. Each X/Y point is called a pixel. However, the X’s and
Y’s work a little differently than what you might be used to in past mathematics
courses or other experiences in life.
In Figure 9.2, we can see that as X goes from the left side of the screen
to the right side of the screen, the X value gets bigger. It starts at zero
on the left side of the screen, and it gets bigger until it reaches the
pixel width value of the screen (which, in this example code, we have set to
screenwidth = 800). Also in Figure 9.2, we can see
that as Y goes down from the top of the screen to the bottom of the screen, the
Y value gets bigger. This is probably backwards from what you have experienced
in mathematics. The Y values start at zero on the top of the screen and get
larger until the Y value reaches the pixel height value of the screen’s height
(which, in the example code, we have set to screenheight = 600).
Additionally in Figure 9.2, we can see the X/Y points
that describe the endpoints of the two green lines drawn using pygame.draw.line.
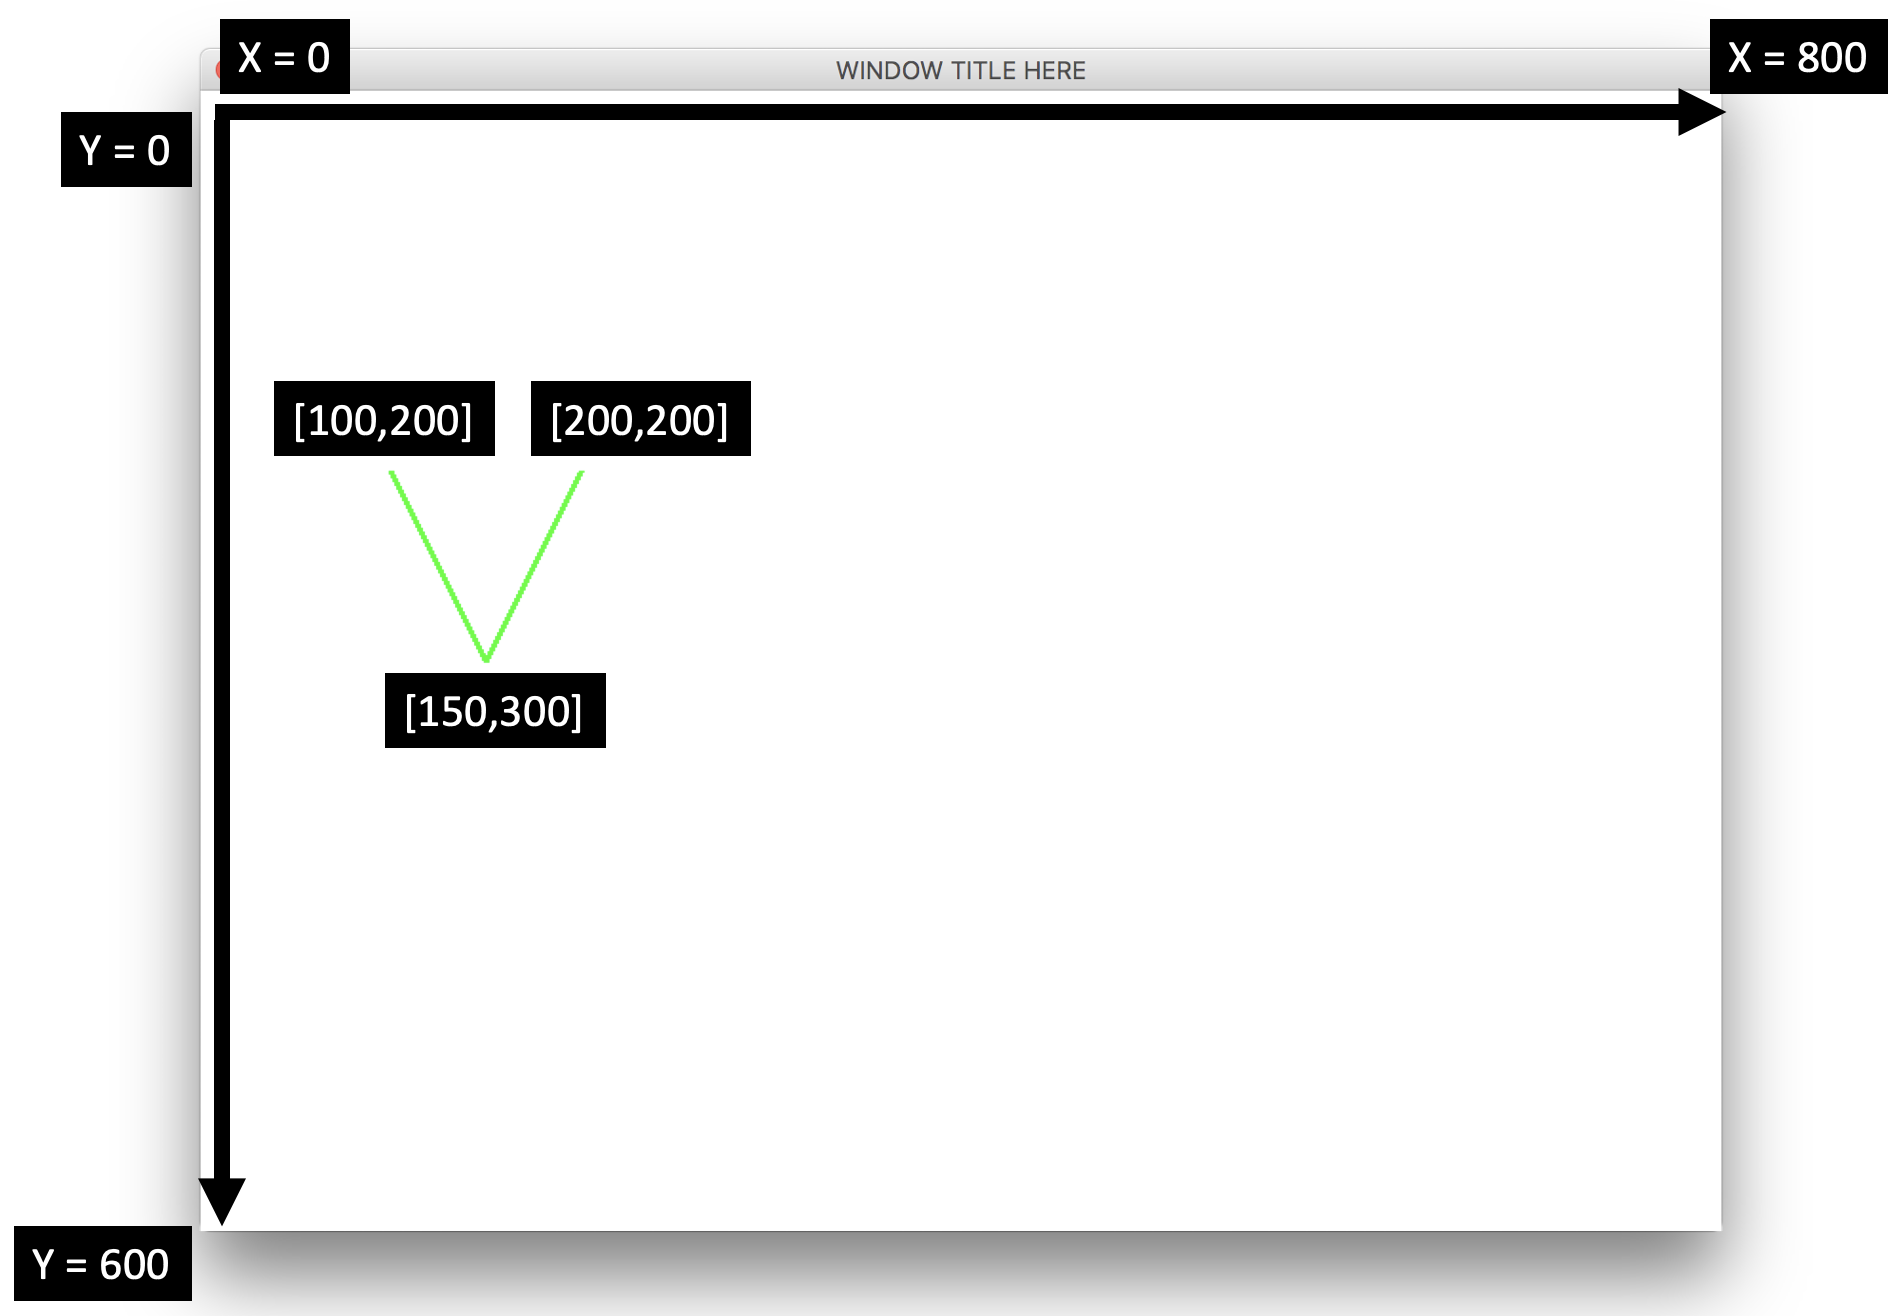
Fig. 9.2 Using the X/Y coordinate system to draw on a screen
Close to the end of the loop body are the following two statements.
# Flip the buffer and do short delay to maintain framerate
pygame.display.flip()
clock.tick(20)
As we use functions from the pygame.draw library, these functions
actually draw graphics off-screen on something called a graphics “buffer.”
When the time comes to show our final work of art, we “flip” the on-screen
and off-screen buffers so that what we’ve drawn finally appears on the
screen. The technical name for this is called double buffering.
If we didn’t use double buffering, it’s possible the user would perceive
each line-draw stroke and the drawing process would look choppy. Just know
that we need to call pygame.display.flip() near the end of the loop
body to make our graphics appear. Figures 9.3
and 9.4 demonstrate the effect of flipping our
double buffered displays if we had just drawn a face on the off-screen
buffer.
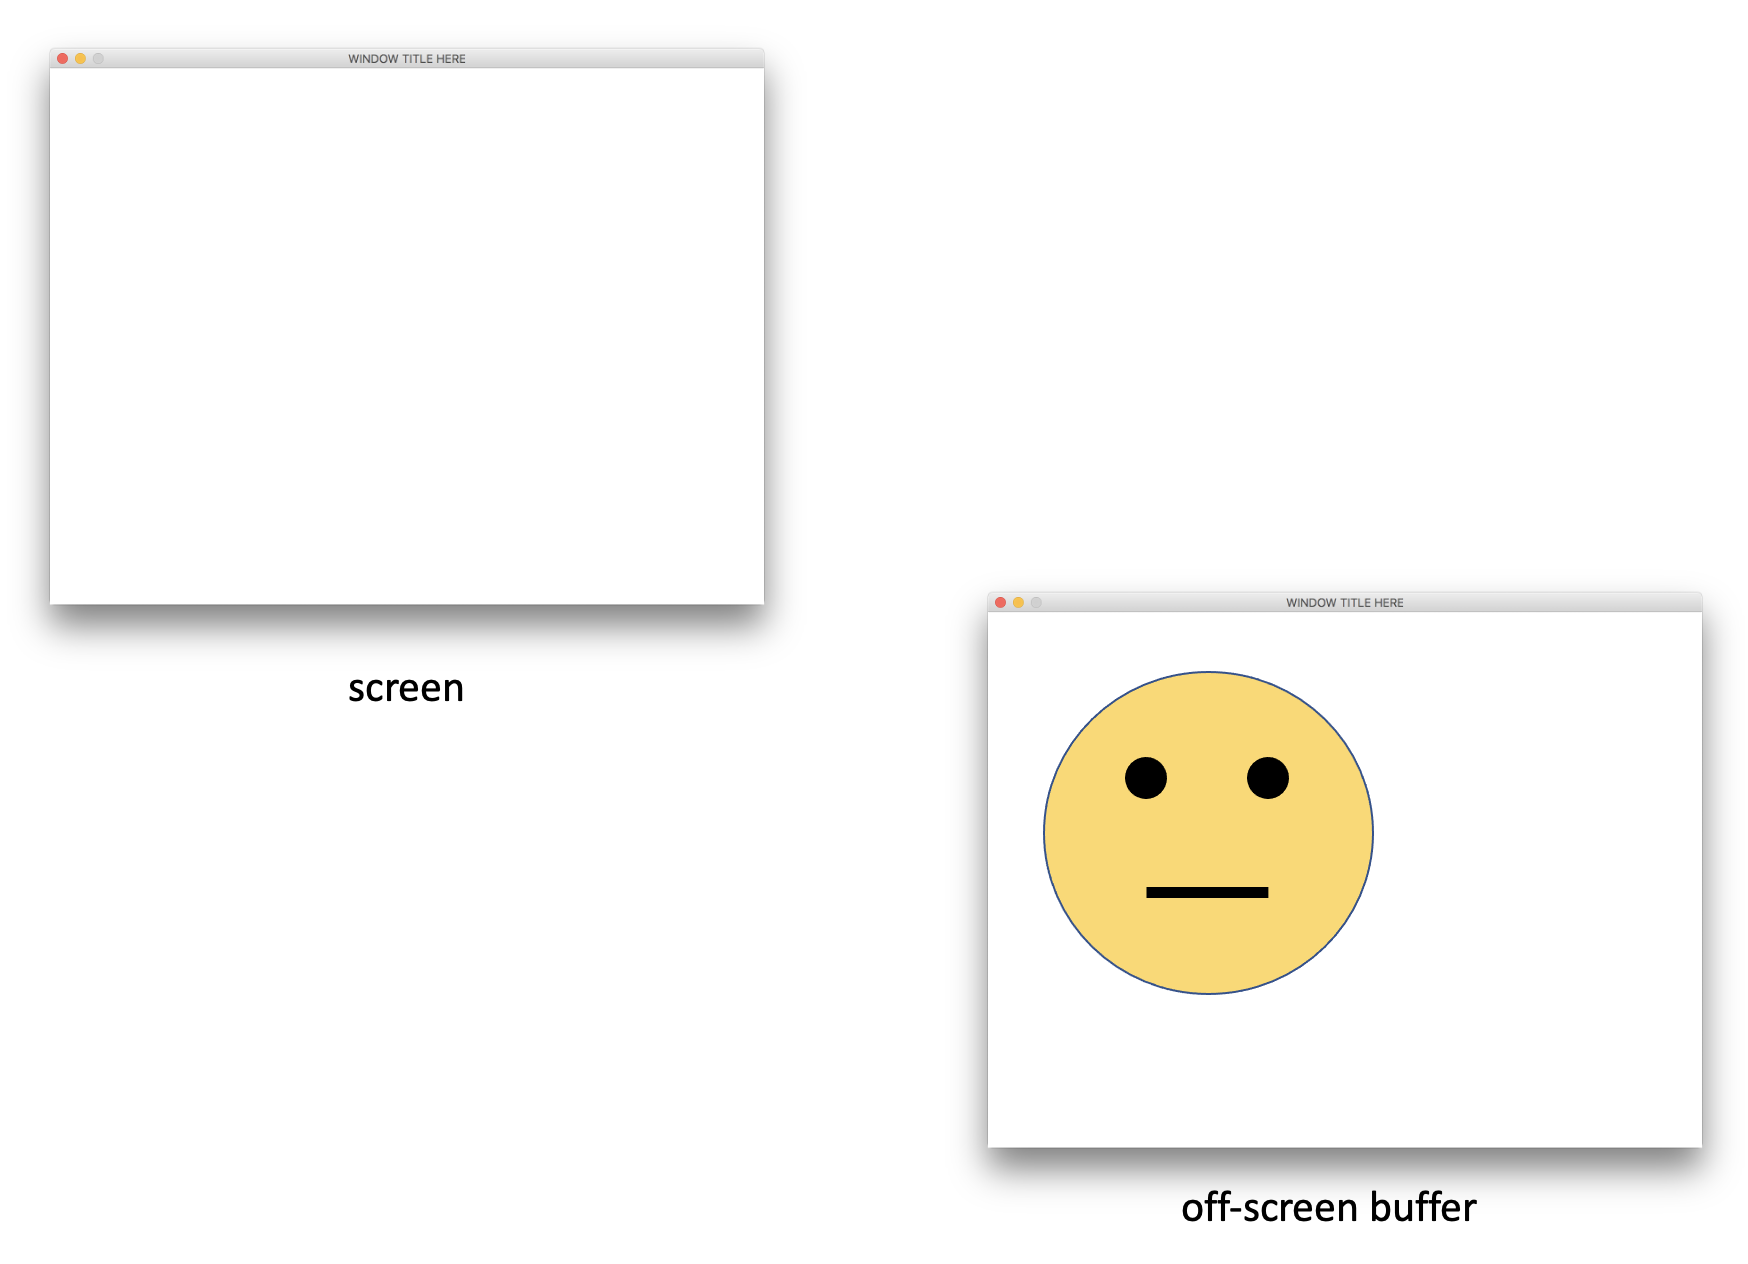
Fig. 9.3 Before calling pygame.display.flip
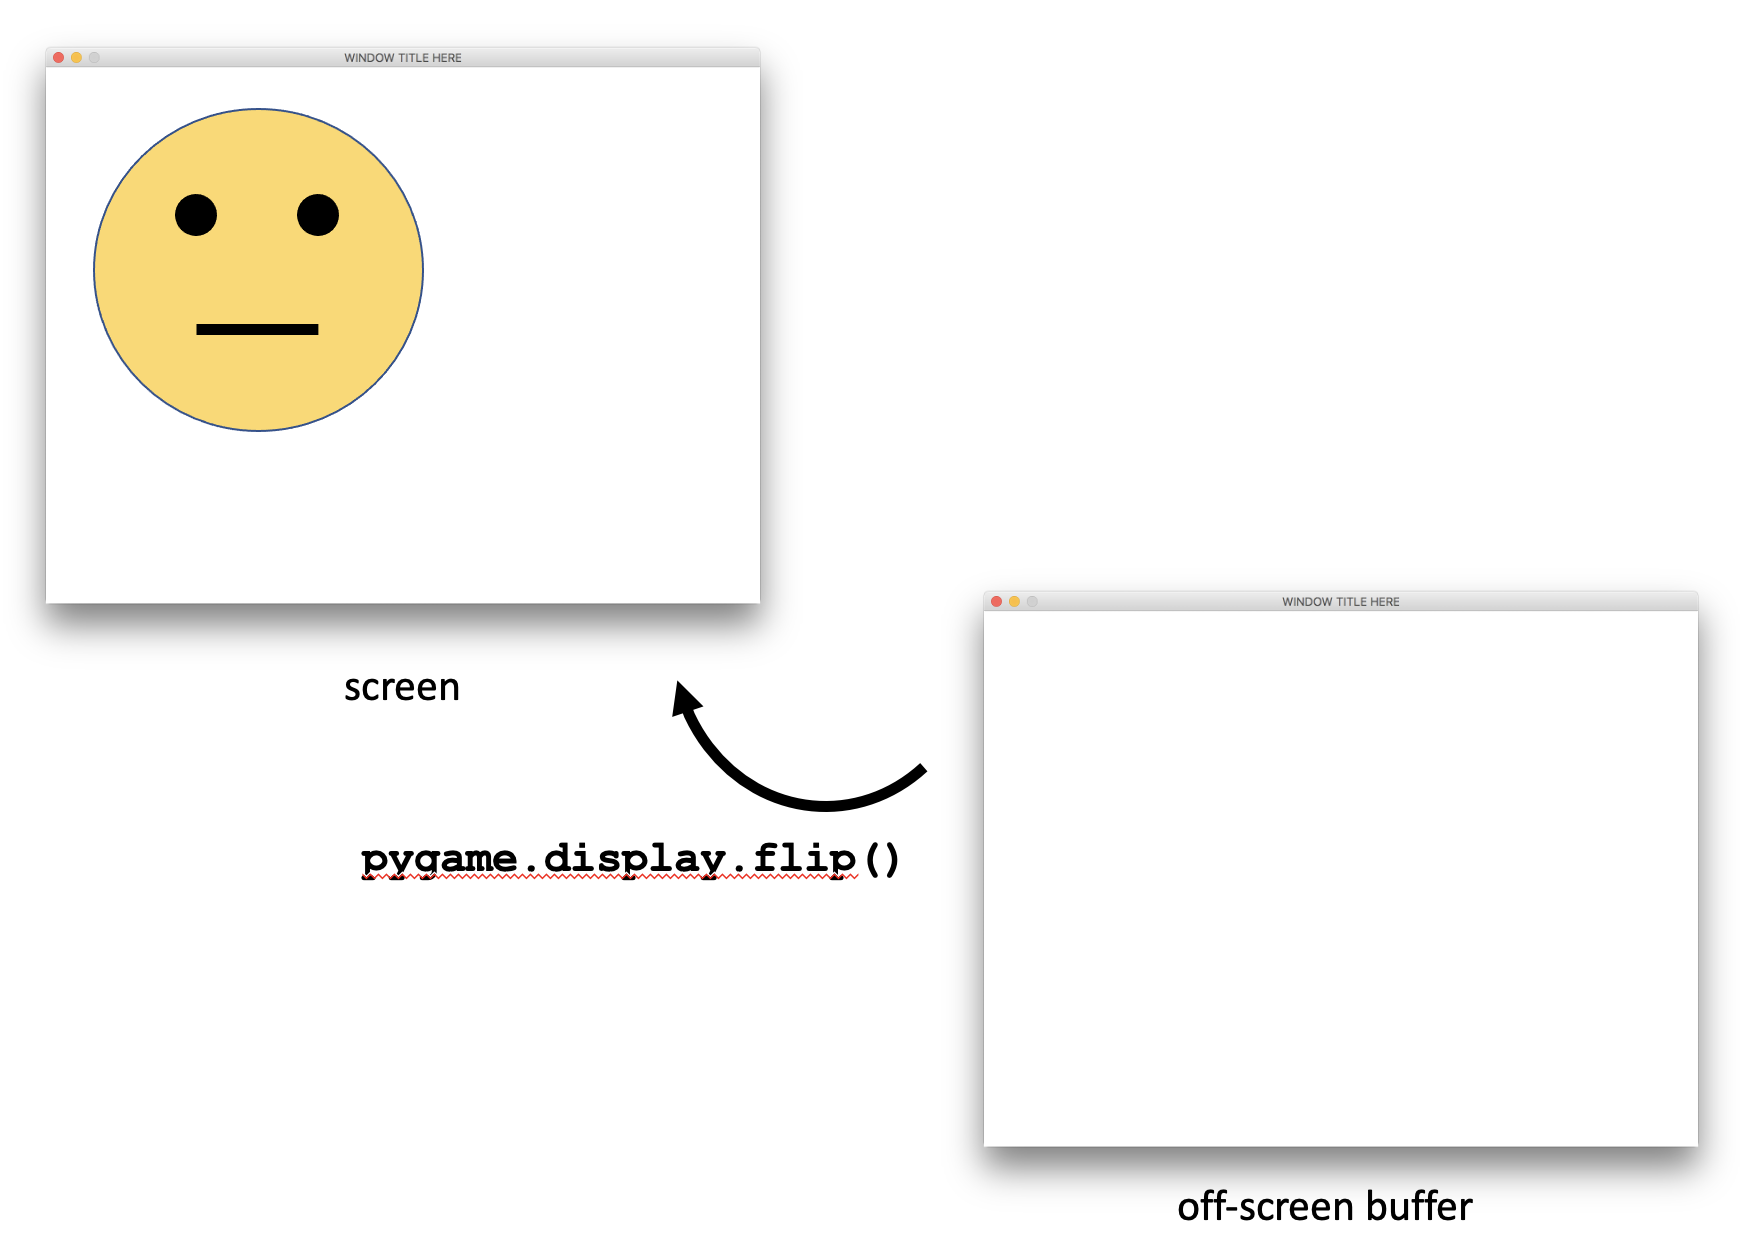
Fig. 9.4 After calling pygame.display.flip
The statement clock.tick(20) controls the framerate of the program.
This introduces a small delay in the loop. Eventually in this chapter,
we will begin animating our graphics. Animation is simply the process of
drawing graphics at slightly different coordinates on the screen. A person’s
vision interprets images drawn at slightly different locations over time
as movement. The small delay introduced by clock.tick helps a human
being to perceive these changes in position over time. The argument passed
to clock.tick (in this case, 20) is the framerate in milliseconds.
Finally, once the program leaves the loop body, the code executes the following code.
pygame.quit()
pygame.quit() closes the window. If we forget to call pygame.quit(),
the program will freeze and we will need to terminate the program through
another means (like the Windows Task Manager or the macOS Force Quit feature)..
We need to be able to draw more than just lines. Let’s consider ellipses (which include circles) and rectangles.
To draw an ellipse, do this:
pygame.draw.ellipse(screen, green, [400, 300, 200, 150], 2)

# The arguments used are:
#
# screen is the surface window on which we wish to draw
# green is the color tuple
# [400, 300, 200, 150] is the list describing the X/Y position
#   of the ellipse and the width and height of an invisible
#   rectangle surrounding the ellipse
# 2 is the pixel width of the border surrounding the ellipse
#
# Thus, this statement draws an ellipse inside an invisible
# rectangle whose upper left corner is at [400,300] that
# is wider (200 pixels) than it is taller (150 pixels).  It
# draws the ellipse with a green border.
We can change the pixel width to 0, and it will fill in the ellipse instead (rather than changing the border color), like this:
pygame.draw.ellipse(screen, green, [400, 300, 200, 150], 0)
To draw a rectangle, do this:
pygame.draw.rect(screen, green, [400, 300, 200, 150], 2)
Knowing what you now know about drawing lines and ellipses, can you draw the face in Figure 9.3? Give it a try!
How did you do? Did you realize you needed to create a yellow color first? Then, did you notice that the yellow circle had a black border around it?
Here is one way you could have drawn the face (see Listing
9.2). Notice line 8 that defines yellow. Then,
notice lines 32 - 33. To get a yellow circle with a black border, we
actually draw the circle twice. First, we draw the yellow circle using
pygame.draw.ellipse. Then, we draw the same circle over the top, only
this time we only draw a black border.
 1import pygame
 2from pygame.locals import *
 3
 4pygame.init()
 5
 6white = (255, 255, 255)
 7black = (0, 0, 0)
 8yellow = (255, 255, 0)
 9
10screenwidth = 800
11screenheight = 600
12screensize = [screenwidth, screenheight]
13screen = pygame.display.set_mode(screensize)
14pygame.display.set_caption("WINDOW TITLE HERE")
15
16clock = pygame.time.Clock()
17
18done = False
19
20while not done:
21    # 1. Process events
22    for event in pygame.event.get():
23        if event.type == pygame.QUIT:
24            done = True
25
26    # 2. Program logic, change variables, etc.
27
28    # 3. Draw stuff
29    screen.fill(white)
30
31    # Draw the head
32    pygame.draw.ellipse(screen, yellow, [50, 50, 400, 400], 0)
33    pygame.draw.ellipse(screen, black, [50, 50, 400, 400], 2)
34
35    # Draw the eyes
36    pygame.draw.ellipse(screen, black, [145, 145, 50, 50], 0)
37    pygame.draw.ellipse(screen, black, [300, 145, 50, 50], 0)
38
39    # Draw the mouth
40    pygame.draw.line(screen, black, [175, 340], [325, 340], 6)
41
42    # Flip the buffer and do short delay to maintain framerate
43    pygame.display.flip()
44    clock.tick(20)
45
46pygame.quit()
Drawing lines, ellipses, and rectangles is a tedious exercise, but it’s worth doing to get a sense of how to draw primitive graphics on an X/Y coordinate surface. As we progress through this chapter, we will find easier ways of dealing with drawing graphics, so keep reading!
The next thing we will learn to do is to take an image in a file and
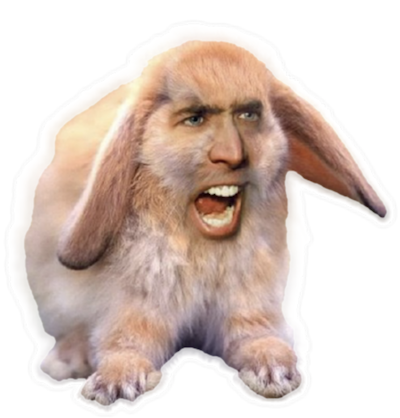
draw it on the screen. First, find an image you like. I’m going to use
the one shown in Figure 9.5, which you can download
here. If you use this image, note that
the image’s filename is niccage_rabbit.png.

Fig. 9.5 Behold! Nicolas Cage as a rabbit!
Ensure that your image is located in the same folder as your code. This is very important. Then, you can use the following code to draw the image onto the screen.
niccage = pygame.image.load("niccage_rabbit.png")
screen.blit(niccage, [5, 10])
This code first loads the image into a variable named niccage. Then
We “blit” the image onto the screen at coordinates [5, 10] or wherever
we would like our image to appear. “Blit” stands for “Block Transfer” and
it is how we copy the contents of one surface onto another. The image
stored in our niccage variable is technically of type Surface, just
like our screen.
If you find an image that you want to use is too big or too small, it’s best to use an image editing program to resize it, like Photoshop or Illustrator (or Microsoft Paint, egads!). Resizing images in code is cumbersome and can be costly when we have fairly sophisticated graphical programs.
If you want to draw a background image, you’ll simply want to make sure
the image fills up the screen, and then you’ll want to draw it at position
[0, 0] so that it fits nicely up against the upper left corner of the
screen.
There is one more important point to realize. Graphics appear in the order they are drawn in your code. If you draw one graphical object A and then another graphical object B that overlaps A, B will appear on top of A. Thus, if you want to have background with images drawn on top of it, you would need to draw the background first, and then draw the other images afterwards.
9.3. Animation, Part 1
In the previous section, we briefly introduced the notion of animation. To animate graphics, we simply draw graphical objects at different coordinates on the screen, each time after a slight delay. A person’s vision interprets images drawn at slightly different locations over time as movement.
To get a sense of how we will do animation, let’s revisit our game loop. The game loop looks something like this (with most of the code omitted):
while not done:
    # 1. Process events

    # 2. Program logic, change variables, etc.

    # 3. Draw stuff


    # Flip the buffer and do short delay to maintain framerate
    pygame.display.flip()
    clock.tick(20)
In Section 9.2, we had code for part 1 and part 3 of the loop, but nothing for part 2. In this section, we will add code to parts 1 and 2 to move our graphical objects and start to detect collisions.
First, we will animate graphics using keystrokes. Specifically, when the user presses an arrow key, we will move the face in that direction. After we have figured that out, in Section 9.4 we will animate graphics automatically without any kind of user intervention.
Let’s use Listing 9.2 as our starting point, which was the code where we drew a face with eyes and a mouth on the screen. Let’s see if we can make the face move using the arrow keys.
If we are going to draw the face in different locations on the screen based on
presses of the arrow keys, we’ll want to keep track of where the face is
currently. This will require some variables. Let’s create variables named
facex and facey to track the X and Y location of upper left corner of the
face. Let’s create those variables near the top of our program where we
create other variables but before the while loop.
 1import pygame
 2from pygame.locals import *
 3
 4pygame.init()
 5
 6white = (255, 255, 255)
 7black = (0, 0, 0)
 8yellow = (255, 255, 0)
 9
10screenwidth = 800
11screenheight = 600
12screensize = [screenwidth, screenheight]
13screen = pygame.display.set_mode(screensize)
14pygame.display.set_caption("WINDOW TITLE HERE")
15
16clock = pygame.time.Clock()
17
18facex = 50
19facey = 50
20
21done = False
22
23# THE REST OF THE CODE IS OMITTED FOR NOW...
facex and facey represent the “state” of the program. When we
try to build video games, we will talk often about the game’s state,
which is always managed through a series of variables that change during
the game loop.
I’ve decided to keep the face at coordinates [50,50] for now. Now, let’s
adjust our drawing code to draw the face using our variables. Thus, our drawing
code changes from this:
# Draw the head
pygame.draw.ellipse(screen, yellow, [50, 50, 400, 400], 0)
pygame.draw.ellipse(screen, black, [50, 50, 400, 400], 2)
to this:
# Draw the head
pygame.draw.ellipse(screen, yellow, [facex, facey, 400, 400], 0)
pygame.draw.ellipse(screen, black, [facex, facey, 400, 400], 2)
If we run our code now, we won’t see any difference, which is good! The code still draws the face in the same location. It’s just using variables to decide where to draw the face now.
Okay, let’s change the values of facex and facey whenever the user
presses and arrow key. To set this up, let’s create a function whose job
it is to handle key presses. We will name it handle_keys.
def handle_keys():
    global facex, facey
    keys = pygame.key.get_pressed()

    # FIXME do something with the key presses
And then down in the while loop in part 1 of the loop body, we will call
handle_keys every time we re-enter the loop:
1while not done:
2    # 1. Process events
3    for event in pygame.event.get():
4        if event.type == pygame.QUIT:
5            done = True
6
7    handle_keys()
If we look at the definition of the handle_keys function, we might wonder
what the keys variable is – the one we are creating using
pygame.key.get_pressed(). The keys variables is actually a really
big list of bool values. It might look something like this:
[False, False, True, False, ..., False]
Each index represents a different key on the keyboard. So, which index represents the left arrow? Which one represents the “J” key? What about the space bar? Well, fortunately, there are a series of variables that tell us what the index of left arrow is, for example, and we already imported those variables at the top of our program when we did this:
from pygame.locals import *
The names of the variables we’re describing all start with K_. For example,
K_LEFT is the left arrow. K_SPACE is the space bar. K_a is
the “A” key. So, if we want to know if the left arrow is pressed, we might
examine the expression keys[K_LEFT] to see if it’s True or False.
Thus, if we want the left arrow to change the face’s X coordinate but subtracting pixels from it, we might do something like this:
def handle_keys():
    global facex, facey
    keys = pygame.key.get_pressed()

    if keys[K_LEFT]:
        # move the face to the left
        facex -= 5
Splendid. Let’s keep going. Based on this kind of logic, can you continue adding code so that the remaining arrow keys have their desired effect?
Try it. I’ll wait.
Okay, how’d you do?
Listing 9.4 offers a solution:
 1def handle_keys():
 2    global facex, facey
 3    keys = pygame.key.get_pressed()
 4
 5    if keys[K_LEFT]:
 6        # move the face to the left
 7        facex -= 5
 8    if keys[K_RIGHT]:
 9        # move the face to the right
10        facex += 5
11    if keys[K_UP]:
12        # move the face up
13        facey -= 5
14    if keys[K_DOWN]:
15        # move the face down
16        facey += 5
Why did I use if rather than elif for each subsequent arrow key?
Realize that a user could simultaneously press the DOWN and RIGHT arrow
keys to attempt to move diagonally down and right. If we used elif on
lines 8 and 14, line 8 would be True and we would never reach line 14.
Let’s put all of this code together in Listing 9.5.
import pygame
from pygame.locals import *

pygame.init()

white = (255, 255, 255)
black = (0, 0, 0)
yellow = (255, 255, 0)

screenwidth = 800
screenheight = 600
screensize = [screenwidth, screenheight]
screen = pygame.display.set_mode(screensize)
pygame.display.set_caption("WINDOW TITLE HERE")

clock = pygame.time.Clock()

facex = 50
facey = 50

def handle_keys():
    global facex, facey
    keys = pygame.key.get_pressed()

    if keys[K_LEFT]:
        # move the face to the left
        facex -= 5
    if keys[K_RIGHT]:
        # move the face to the right
        facex += 5
    if keys[K_UP]:
        # move the face up
        facey -= 5
    if keys[K_DOWN]:
        # move the face down
        facey += 5

done = False

while not done:
    # 1. Process events
    for event in pygame.event.get():
        if event.type == pygame.QUIT:
            done = True
    handle_keys()

    # 2. Program logic, change variables, etc.

    # 3. Draw stuff
    screen.fill(white)

    # Draw the head
    pygame.draw.ellipse(screen, yellow, [facex, facey, 400, 400], 0)
    pygame.draw.ellipse(screen, black, [facex, facey, 400, 400], 2)

    # Draw the eyes
    pygame.draw.ellipse(screen, black, [145, 145, 50, 50], 0)
    pygame.draw.ellipse(screen, black, [300, 145, 50, 50], 0)

    # Draw the mouth
    pygame.draw.line(screen, black, [175, 340], [325, 340], 6)

    # Flip the buffer and do short delay to maintain framerate
    pygame.display.flip()
    clock.tick(20)

pygame.quit()
Run the code in Listing 9.5. Oh no! When we press the arrow keys, the head moves… but the eyes and mouth stay put. Do you have an idea why this might be?
Notice that we use the values of facex and facey to draw the head,
but we don’t use them to draw the rest of the face. As facex and
facey change, the head gets re-drawn each time in the loop body
using those new values, but the eyes and mouth are always drawn using
absolute coordinates.
To fix this, we will need to draw the position of the eyes and mouth
relative to facex and facey. For example, the left eye’s X
coordinate is 145, which is 145 - 50 = 95 pixels left of facex.
The left eye’s Y coordinate is the same: 145 - 50 = 95. We can apply
this same thought process to the right eye and mouth, which yields this
code:
# Draw the head
pygame.draw.ellipse(screen, yellow, [facex, facey, 400, 400], 0)
pygame.draw.ellipse(screen, black, [facex, facey, 400, 400], 2)

# Draw the eyes
pygame.draw.ellipse(screen, black, [facex + 95, facey + 95, 50, 50], 0)
pygame.draw.ellipse(screen, black, [facex + 250, facey + 95, 50, 50], 0)

# Draw the mouth
pygame.draw.line(screen, black, [facex + 125, facey + 290],
                                [facex + 275, facey + 290], 6)
If you’d like to download a “fresh copy” of our code so far, you can download it here: move-face.py.
9.4. Animation, Part 2
Now that we have figured out how to animate graphics using keyboard keys, let us attempt to move graphics autonomously, in other words, make them move on their own without user intervention.
We will use the following starting code, in which we’ve made the face a little
smaller so that it does not take up so much of the screen. We’ve also removed
the handle_keys function. You are encouraged to download your own copy
of this code here: bounce-face-starter.py. Go ahead and rename
your code bounce-face.py.
import pygame
from pygame.locals import *

pygame.init()

white = (255, 255, 255)
black = (0, 0, 0)
yellow = (255, 255, 0)

screenwidth = 800
screenheight = 600
screensize = [screenwidth, screenheight]
screen = pygame.display.set_mode(screensize)
pygame.display.set_caption("WINDOW TITLE HERE")

clock = pygame.time.Clock()

facex = 50
facey = 50

done = False

while not done:
    # 1. Process events
    for event in pygame.event.get():
        if event.type == pygame.QUIT:
            done = True

    # 2. Program logic, change variables, etc.

    # 3. Draw stuff
    screen.fill(white)

    # Draw the head
    pygame.draw.ellipse(screen, yellow, [facex, facey, 150, 150], 0)
    pygame.draw.ellipse(screen, black, [facex, facey, 150, 150], 2)

    # Draw the eyes
    pygame.draw.ellipse(screen, black, [facex + 40, facey + 40, 10, 10], 0)
    pygame.draw.ellipse(screen, black, [facex + 100, facey + 40, 10, 10], 0)

    # Draw the mouth
    pygame.draw.line(screen, black, [facex + 45, facey + 100],
                                    [facex + 100, facey + 100], 3)

    # Flip the buffer and do short delay to maintain framerate
    pygame.display.flip()
    clock.tick(20)

pygame.quit()
We are going to move the face autonomously (i.e, on its own). This is as
simple as changing facex and facey in the body of the loop in
part 2., like this:
# 2. Program logic, change variables, etc.
facex += 5
facey += 5
We are sending the face down and to the right. Each time through the loop body, we update the location of the face, so it gets drawn slightly farther down the screen each time.
Add this code and run it!
Off it goes! There goes the face. Going… going… gone! Why did it move
off the screen? Why didn’t it stop when it reached the edge? The answer, of
course, is because we told it to. As long as the program is running, we keep
adding 5 to facex and facey. The dimensions of our screen are 800x600,
so once facex and facey exceed that, the face will leave the screen.
Before we go any further, we should put all of the face movement code into its own function. Change part 2 of the loop to this:
# 2. Program logic, change variables, etc.
move_face()
and define the new function like so:
def move_face():
    global facex, facey

    facex += 5
    facey += 5
Very good. Now, the problem with move_face is that it adds 5 to
facex and facey no matter what. If the face touches a “wall”
(that is, the top, bottom, left, or right edge of the screen), we may need
to subtract rather than add 5 pixels to facex or facey.
Let’s state this another way, and consider horizontal movement only for now.
To move the face horizontally, we always want to add some amount to facex,
and that amount is how much we want to change the position
of the face. If the amount is +5, we are moving the face to the right.
If the amount is -5, we are moving the face to the left.
What if we made a variable named xchange. xchange can keep track
of whether we are adding +5 or -5 to facex. If the face touches an edge,
we change the sign of xchange. Changing the sign from positive to negative
or from negative to positive is as simple as multiplying it by -1. So,
consider the following pseudocode.
def move_face():
    global facex, facey

    # if we touch the left or right wall
    #    change the sign of xchange
    #
    # add xchange to facex no matter what
Okay. Now let’s change our pseudocode to actual Python code. First, let’s do the left wall.
def move_face():
    global facex, facey

    if facex <= 0: # just the left wall first
        xchange = xchange * -1

    facex += xchange
Recall that facex is the X coordinate of the upper left corner of the face.
If it’s zero (or if it accidentally goes past zero into the negatives),
we will flip the direction so that it heads towards the right. If we want to
detect whether the face has touched the right wall, we cannot just do this:
def move_face():
    global facex, facey

    if facex <= 0 or facex >= screenwidth: # the right wall logic is WRONG
        xchange = xchange * -1

    facex += xchange
While it is correct that screenwidth tells us the pixel location of the
right wall, we have failed to account for the width of the face. When we
drew the face, the width we used was 150. Thus, the expression
facex + 150 tells us the X of the right side of the face, like this:
def move_face():
    global facex, facey

    if facex <= 0 or facex + 150 >= screenwidth:
        xchange = xchange * -1

    facex += xchange
If we define xchange globally and then add xchange to our list of
globals, we should be all set. We will choose 5 as the starting value
of xchange, which will send the face to the right initially.
facex = 50
facey = 50
xchange = 5
ychange = 5
and then,
1def move_face():
2    global facex, facey, xchange, ychange
3
4    if facex <= 0 or facex + 150 >= screenwidth:
5        xchange = xchange * -1
6
7    facex += xchange
Now that the X coordinate logic is done, the Y coordinate logic is basically
the same (only we use facey, ychange, and screenheight).
Before we do that, we should probably talk about magic numbers. Magic
numbers are number values in your code that you are forcing yourself to
remember, like 150 being the width of the face. To a programmer looking
at your code for the first time, they might ask “Why are you adding 150 here?”
That’s not good, and it makes your code harder to maintain.
Instead of having a magic number like 150, let’s replace it with a variable
whose name describes what it is, i.e., facewidth. Likewise, we’ll have
faceheight to describe how tall the face is.
The end result, with Y coordinate logic added and magic numbers replaced with
descriptive variables, is shown in Listing 9.7.
You’ll notice I’ve also introduced a variable facespeed in place of 5.
That way, we can change the speed of the face simply by changing one variable.
Nifty!
I’ve included one more little extra surprise in Listing 9.7. Pygame allows us to play sounds when we wish. We’re going to play a “boing” sound whenever we hit a wall. First, download the sound file and place it into the same folder as your code. Then, note lines 25, 32, and 35. Line 25 loads the sound file. Lines 32 and 35 play the sound whenever the face hits the wall.
Listing 9.7 can be downloaded in its entirety here: bounce-face.py.
 1import pygame
 2from pygame.locals import *
 3
 4pygame.init()
 5
 6white = (255, 255, 255)
 7black = (0, 0, 0)
 8yellow = (255, 255, 0)
 9
10screenwidth = 800
11screenheight = 600
12screensize = [screenwidth, screenheight]
13screen = pygame.display.set_mode(screensize)
14pygame.display.set_caption("WINDOW TITLE HERE")
15
16clock = pygame.time.Clock()
17
18facex = 50
19facey = 50
20facewidth = 150
21faceheight = 150
22facespeed = 5
23xchange = facespeed
24ychange = facespeed
25sound = pygame.mixer.Sound("bounce.wav")
26
27def move_face():
28    global facex, facey, xchange, ychange
29
30    if facex <= 0 or facex + 150 >= screenwidth:
31        xchange = xchange * -1
32        sound.play()
33    if facey <= 0 or facey + 150 >= screenheight:
34        ychange = ychange * -1
35        sound.play()
36
37    facex += xchange
38    facey += ychange
39
40done = False
41
42while not done:
43    # 1. Process events
44    for event in pygame.event.get():
45        if event.type == pygame.QUIT:
46            done = True
47
48    # 2. Program logic, change variables, etc.
49    move_face()
50
51    # 3. Draw stuff
52    screen.fill(white)
53
54    # Draw the head
55    pygame.draw.ellipse(screen, yellow, [facex, facey, 150, 150], 0)
56    pygame.draw.ellipse(screen, black, [facex, facey, 150, 150], 2)
57
58    # Draw the eyes
59    pygame.draw.ellipse(screen, black, [facex + 40, facey + 40, 10, 10], 0)
60    pygame.draw.ellipse(screen, black, [facex + 100, facey + 40, 10, 10], 0)
61
62    # Draw the mouth
63    pygame.draw.line(screen, black, [facex + 45, facey + 100],
64                                    [facex + 100, facey + 100], 3)
65
66    # Flip the buffer and do short delay to maintain framerate
67    pygame.display.flip()
68    clock.tick(20)
69
70pygame.quit()
9.5. Objects and Classes
In the previous section, we learned to make a face bounce around the screen.
It was gloriously awesome! But what would happen if we tried to add some
features? What if we wanted to add a whole bunch of faces (like
ten!) and have them all bounce around the screen and bounce off each other?
Can you imagine all the crazy if-statement code we would need to write to
make all that happen, and how much code we would need to add and modify every
time we added a new face to the screen? That would be super bogus and awful.
Fortunately, modern programming languages have a mechanism for dealing with interactions between code “objects” like bouncing balls. It’s called object-orientation.
In object-orientation, we have objects and we have classes. An object has its own data and its own functions that do stuff with that data. A class is like a prototype for making a bunch of new objects that all have the same “structure.”
This is best explained using examples, and believe it or not, you’ve been
using classes and objects and you haven’t realized it. A string is one
example of an object. The data in a string is the string’s characters.
The functions are things like .lower, .replace, etc., all of which
do something with the data kept in the string object. The class used to
create different strings is called str.
We will explore the relationship between objects and classes visually. Suppose we create and use two string variables as in Listing 9.8. Each variable contains a value known as a string object. Figure 9.6 shows us the two objects. Notice how they have the same “form” but not the same exact data. The form of an object is defined by its class. Eventually, we will show you how to define a class. Notice in Figure 9.6 how I’ve decided to depict each object. We can see the data “inside” the object. We can also see a couple of the functions represented as “tubes” that allow access into the inside of the object.
1s1 = "Good cop"
2s2 = "Bad cop"
3x = s1.lower()
4y = s2.lower().replace("bad", "good")
5if x == y:
6    print("Yay.")
7else:
8    print("What?")
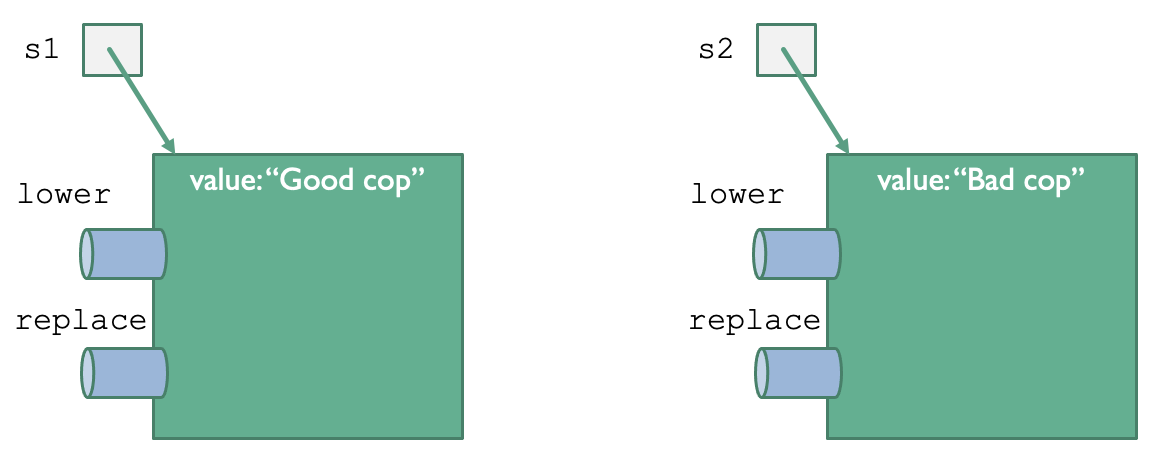
Fig. 9.6 Two string objects
To recap what we’ve learned so far:
All string objects have the same form.
The code that defines the form is called a class.
Each object has its own data.
The class defines the common structure for each object.
We can know what the class of an object is by using the type function.
We can interactively check the class of an object stored in variable using
the Python shell window like this:
>>> s1 = "Good cop"
>>> type(s1)
<class 'str'>
Strings are special objects in Python. When we create them using an assignmentn statement, Python allows us to use a short-hand notation that we’ve been unaware of until now. This:
s = "123"
is actually:
s = str(123)
We know that str is every string object’s class. Here, it also looks
like a function. It’s a special type of function known as a constructor.
A constructor is a function that uses a class to create a new object.
Let us pretend that we have a new class named Circle. Notice that Circle
starts with a capital letter. By convention, from here forward we will
capitalize the names of our classes. That way it is easy to tell what things
are variables that contain objects, and we can tell what things are the names
of classes.
With this Circle class that we are pretending we can use, we might be able
to write code like this:
c1 = Circle()
c1.x = 0
c1.y = 0
c1.w = 100
c1.h = 100
c1.color = black
c1.draw(screen)

c2 = Circle()
c2.x = 100
c2.y = 200
c2.w = 200
c2.h = 275
c2.color = turquoise
c2.draw(screen)
Listing 9.9 will give us the opportunity to
introduce some terminology. This terminology will help us talk unambiguously
about objects and classes, and very soon I will show you how to actually
create this Circle class so that we can use it for real. In Listing
9.9, we are creating two separate
Circle objects. They have the same form, but they keep track of separate
data. Figure 9.7 introduces the terminology we will
be using.
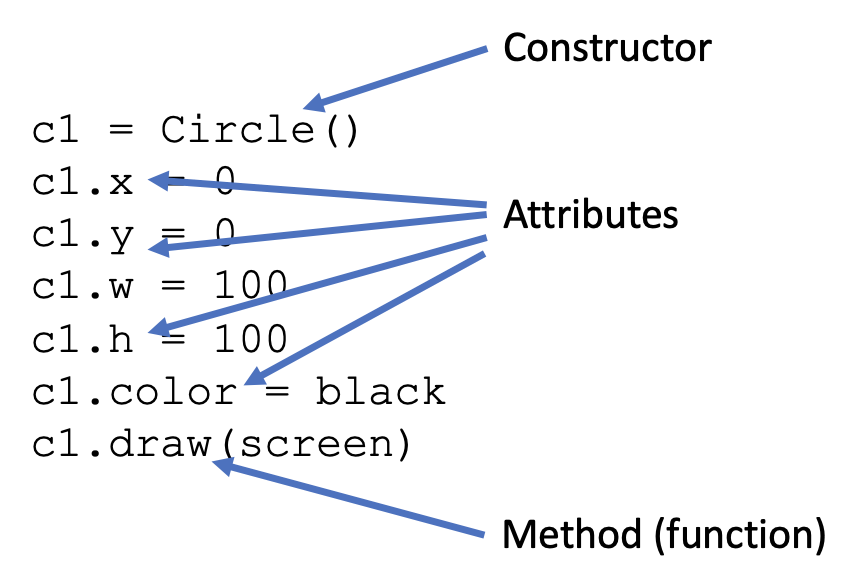
Fig. 9.7 Class/object terminology
We have already encountered the term constructor. A constructor is a function that makes a new object by copying a class’s structure.
The next term is attribute. An attribute is a variable that is contained
inside an object. We might say that an attribute belongs to that object.
Attributes can be accessed using “dot-notation.” Thus, c1.x is c1’s
x attribute or x variable.
The last term is method. Any function that belongs to an object is called a method. Methods are functions that belong to an object. Methods are defined by the class used to create the object in the first place.
Notice that we have stored all of the different things we care about with
regard to a circle in attributes. Recall that when we draw a circle in
Pygame, we will need to know the circle’s x, y, width, height, and color.
Instead of having separate variables like c1x, c1y, c1width, etc.,
now we can keep them all together in a single variable named c1, and
then access their attributes using the dot-notation.
Presumably, when it comes time to define the draw method, we can use
these attributes when we call pygame.draw.ellipse.
Okay, are you ready to see how to actually program the Circle class
so that we can use it for real?
Defining a class looks like this:
1class Circle:
2    def __init__(self):
3        self.x = 0
4        self.y = 0
5        self.w = 100
6        self.h = 100
7        self.color = black
Let’s break it down. Line 1 is the start of the class definition and it seems pretty straightforward. The rest of the class definition is indented below it. Then we have line 2… ummm, okay, that looks kind of weird. What’s going on there?
Well, line 2 is clearly the start of a function since it begins with the
Python keyword def. Then, we have the word “init” but it starts with
two underscores and it ends with two underscores. Python programmers
(a.k.a. “Pythonistas”) use the word “dunder” when they want to talk about
names having double underscores, so we often pronounce __init__ aloud
as “dunder init dunder” or simply “dunder init”. __init__ has a single
parameter as well, and we have chosen to call it self for reasons that
will make sense shortly.
The body of the function in this particular example contains only a series
of assignment statements. In each statement, we are taking the self
parameter and changing the value of one of its attributes. Notice that
this self variable appears to have the same attributes as the Circle
objects in Listing 9.9. That’s interesting.
Does that mean that self is a Circle object? As turns out, it is!
To understand what’s going on here, let’s take a closer look at what happens
when you use the Circle constructor in your main code. In Figure
9.8, we can see code that makes a Circle object
named c1. When the Python interpreter goes to run this code, it
actually “re-writes” the code as shown in the figure. Thus, the Circle
object itself is passed as an argument to __init__, so self
refers to the c1 object.

Fig. 9.8 What really happens when we call a constructor function
Whenever we use a class’s constructor to create a new object, the new
object is passed into the self parameter. The “context” of the body
of that function is then whichever circle we’re manipulating.
Any methods that belong to objects of that class work the same way.
Any method must have a self parameter as its first parameter so
that we know which Circle object we’re using. For example, circles
are supposed to have a method named draw, which we used in Listing
9.9 to draw the circle on the screen
using its attributes, like this:
c1.draw(screen)
Notice that draw looks like it only has one parameter, the screen object,
but in fact there are two. The first real parameter must be self, and
the second then becomes the screen variable. Figure
9.9 helps us understand this more clearly.

Fig. 9.9 What really happens when we call a method on an object
We must now implement (i.e., “write the code for…”) the draw method
to make it work. Here is what we’ll do (see Listing
9.11).
 1class Circle:
 2    def __init__(self):
 3        self.x = 0
 4        self.y = 0
 5        self.w = 100
 6        self.h = 100
 7        self.color = black
 8
 9    def draw(self, screen):
10        pygame.draw.ellipse(screen, self.color,
11                            [self.x, self.y, self.w, self.h], 0)
This is one thing that often trips up novice programmers (and sometimes
experienced ones, too). Any time we create a new method definition
as part of a class definition, we must remember to make self the
first parameter of the method even though we don’t explicitly pass a
value to self. Think of self as a hidden parameter.
9.6. Extending Classes to Make New Classes
Sometimes we want to define a new class that is very similar to a class
we already have. Maybe we want a Face class. Drawing a Face
is very similar to drawing a Circle. To draw a face, all we need to do
is draw a circle first, and then finish by drawing eyes and a mouth.
In Python, we can extend the Circle class to define the Face
class in such a way that we don’t have to re-invent the metaphorical wheel.
In the Face class, we will only write code that deals with the eyes and
mouth. When it is time to do the circle, we will have Face defer to
the Circle code so we don’t need to copy/paste that code, too.
Terminology time! As we just said, we are going to extend the Circle
class to make the Face class. When we do this, the Circle class
is called the superclass or the parent class. The Face class
is known as the subclass or child class. Figure
9.10 shows this relationship in code.
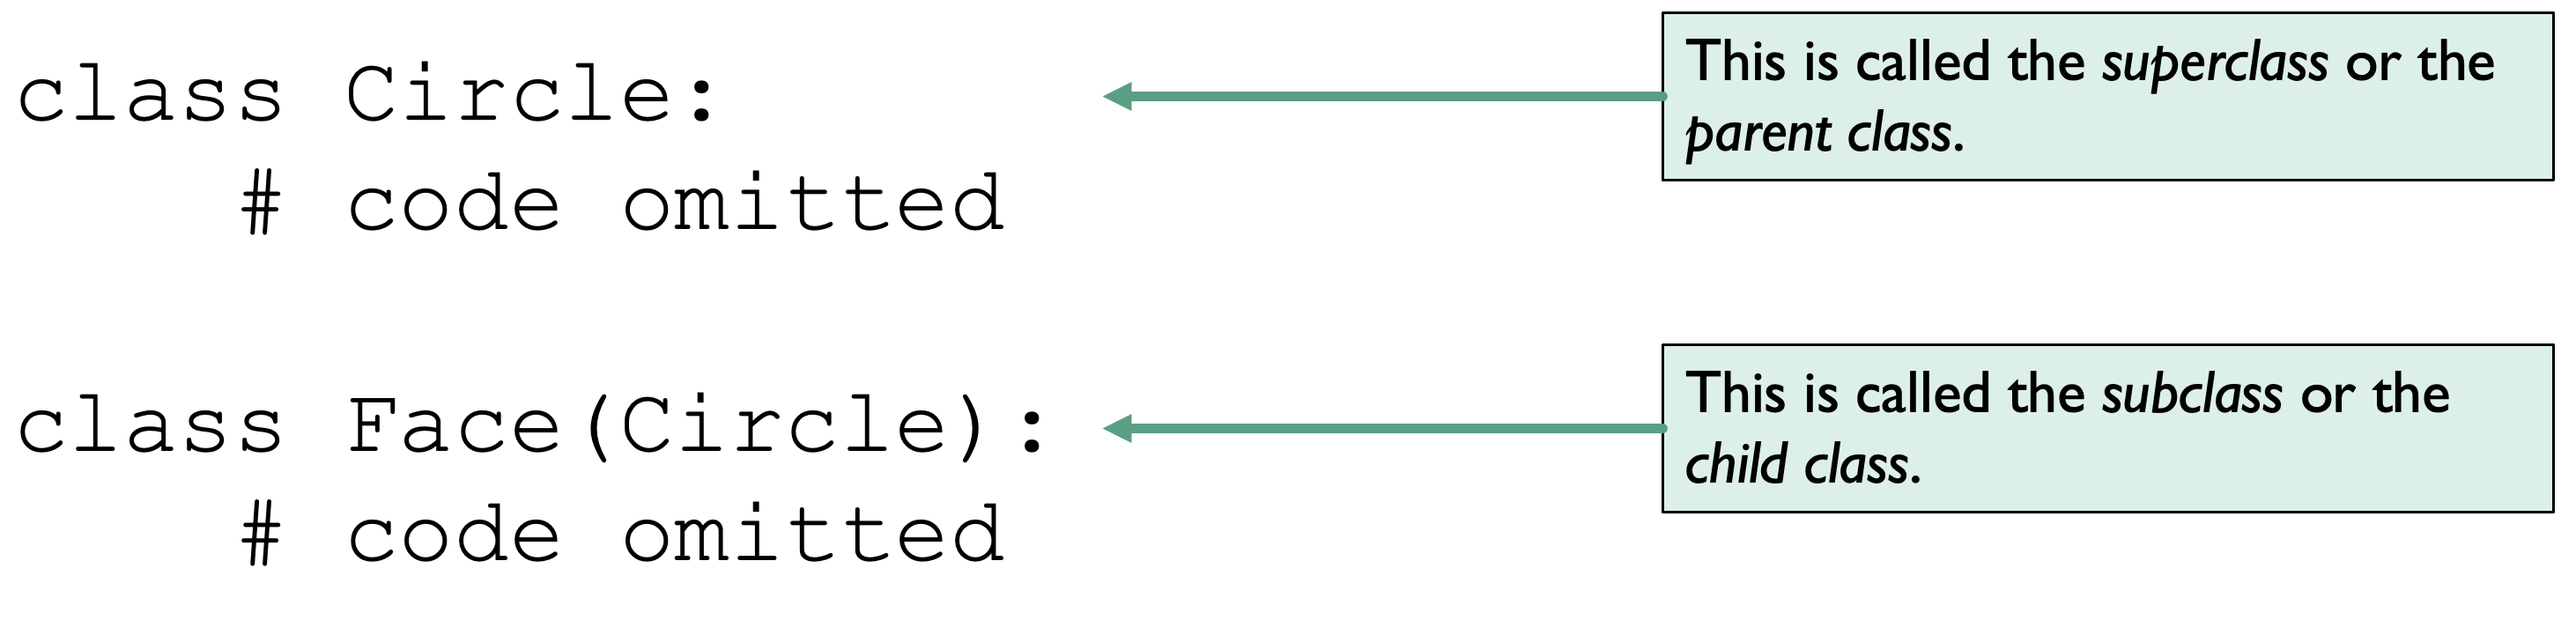
Fig. 9.10 Parent class and child class
Observe that the first line of the Face class definition is a little
different. It has parentheses containing the word Circle. If
we want Face to be based on Circle and have Circle as its
parent class, we write class Face(Circle):.
Now, let’s program the body of the Face class. See Listing
9.12.
1class Face(Circle):
2    def __init__(self):
3        super().__init__()
4
5    def draw(self, screen):
6        super().draw(screen)  # Draw the circle
7
8        # Now, draw the rest of the face.
The expression super() allows us to interact with the Circle code.
super() gives us a reference to the Circle “portion” of our self
object, which allows us to call Circle methods, like the Circle
constructor __init__ and, in line 6 of Listing 9.12,
the Circle’s draw method.
Let’s see how we might use these two new classes. Listing 9.13 shows an example program that you should examine and then try to modify in different ways. If you’d like to download it and try it for yourself, use this link: face-ex.py.
import pygame
from pygame.locals import *

pygame.init()

white = (255, 255, 255)
black = (0, 0, 0)
red = (255, 0, 0)
green = (0, 255, 0)
turquoise = (0, 255, 255)
yellow = (255, 255, 0)

class Circle:
    def __init__(self):
        self.x = 0
        self.y = 0
        self.w = 100
        self.h = 100
        self.color = black

    def draw(self, screen):
        pygame.draw.ellipse(screen, self.color,
                            [self.x, self.y, self.w, self.h], 0)

class Face(Circle):
    def __init__(self):
        super().__init__()

    def draw(self, screen):
        super().draw(screen)

        x1 = self.x + (self.w / 3)
        x2 = x1 + (self.w / 3)
        y1 = self.y + (self.h / 3)
        y2 = y1 + (self.h / 3)

        pygame.draw.ellipse(screen, black, [x1, y1, 5, 5], 0)
        pygame.draw.ellipse(screen, black, [x2, y1, 5, 5], 0)
        pygame.draw.line(screen, black, [x1, y2], [x2, y2], 3)


screenwidth = 800
screenheight = 600
screensize = [screenwidth, screenheight]
screen = pygame.display.set_mode(screensize)
pygame.display.set_caption("Drawing with Classes")

clock = pygame.time.Clock()


done = False

c1 = Circle()

c2 = Circle()
c2.x = 100
c2.y = 200
c2.w = 200
c2.h = 275
c2.color = turquoise

f1 = Face()
f1.x = 400
f1.y = 200
f1.w = 200
f1.h = 200
f1.color = yellow

f2 = Face()
f2.x = 450
f2.y = 450
f2.w = 75
f2.h = 75
f2.color = green

redface = Face()
redface.x = 300
redface.y = 50
redface.w = 200
redface.h = 100
redface.color = red

while not done:
    # 1. Process events
    for event in pygame.event.get():
        if event.type == pygame.QUIT:
            done = True

    # 2. Program logic, change variables, etc.

    # 3. Draw stuff
    screen.fill(white)
    c1.draw(screen)
    c2.draw(screen)
    f1.draw(screen)
    f2.draw(screen)
    redface.draw(screen)

    pygame.display.flip()
    clock.tick(20)

pygame.quit()
The ability to extend one class to create another child class is called inheritance because the child class inherits the attributes and methods of the parent class. We are introducing this concept because it allows us to build on already existing code.
In the next section, we will learn about Pygame sprites. A Sprite is a
class that contains all sorts of awesome code that helps us draw an image on
the screen while managing a rectangle around the image. Sprite methods
already exist that help us determine whether the rectangles of two sprite
are touching one another. Through inheritance, we will extend the Sprite
class to create basic 2-dimensional video games. Let’s go!
9.7. Pygame Sprites
The pygame.sprite package contains all sorts of useful classes for making
interactive graphical programs. We will be using two of them primarily.
pygame.sprite.SpriteA class that we can subclass to make new Pygame on-screen objects
Makes it easier to detect collisions between sprites
pygame.sprite.GroupA class that groups sprites together like a list
Allows us to draw all sprites in a group at once
Allows us to determine whether one sprite has collided with any number of other sprites who are of the same type
Notice that the package name pygame.sprite is in all lowercase, and
then the class name starts with a capital letter, like “S” in Sprite
and “G” in Group.
When it comes time to create a child class of the Sprite class
(let’s call it Player, for example), we would begin our class
definition like this:
class Player(pygame.sprite.Sprite):
We could also achieve the same effect by doing this:
from pygame.sprite import Sprite

class Player(Sprite):
Suppose we are making a 2-dimensional game (like Super Marios Bros. or Legenda
of Zelda), and we have an image of an adventurer that we’ve named player.gif.
Let us suppose that image is in the same folder as our code. The following code
makes a Sprite subclass named Player that uses our image, and then it
uses the Player class definition to create a new Player object that we
could use in our game.
class Player(pygame.sprite.Sprite):
    def __init__(self):
        super().__init__()
        self.image = pygame.image.load("player.gif")
        self.rect = self.image.get_rect()

player_one = Player()
The Pygame sprite documentation
states that any Sprite must possess two attributes: an image and a rect.
The image attribute is a Pygame Surface, much like a screen that we can
draw on. The image attribute is loaded using pygame.image.load in line 4.
The rect attribute stores the x, y, width, and height of the
sprite on the screen. We fill in this rect value by getting the size of the
rectangle around the image attribute. Given that the sprite’s X/Y position
is stored in the rect attribute, if we wanted to place our new
player_one object at the very top left corner of the screen, we would write
this code:
player_one.rect.x = 0
player_one.rect.y = 0
We may want to introduce another type of sprite on the screen, like an enemy
for our player. The best way to accomplish this is to create another sprite
subclass. If we have an enemy image named enemy.gif, we can easily create
an Enemy class.
 1class Player(pygame.sprite.Sprite):
 2    def __init__(self):
 3        super().__init__()
 4        self.image = pygame.image.load("player.gif")
 5        self.rect = self.image.get_rect()
 6
 7class Enemy(pygame.sprite.Sprite):
 8    def __init__(self):
 9        super().__init__()
10        self.image = pygame.image.load("enemy.gif")
11        self.rect = self.image.get_rect()
12
13player_one = Player()
14boss = Enemy()
NOTICE: This portion of the book is currently being re-written. Check back later for an update to this edition.